Opening Documents
Whenever you want to write information in Word, you first need to create a new document or open an existing document. This page provides some useful information that may help you to open existing documents more quickly and easily.
Opening Recent Documents
The documents that are easiest to open are the documents included in the list of recent documents. This list is displayed by default, but you can adjust the number of recent documents shown in it or you can configure Word not to display this list at all. In Word 2010, when you click the File tab and then click Recent in the left-hand pane of Backstage view, the list of recent documents is displayed in the middle pane. It is also possible to configure Word 2010 to display the list of recent documents immediately in the left-hand pane when Backstage view opens (see below). In Word 2007, the Recent Documents list is displayed in the right-hand column of the drop-down menu that appears when you click the Microsoft Office Button. In all versions, you can click the name of a file in the list to open it.
It is possible to pin items in the Recent Documents list. By default, each document is marked by an inactive pin ( ). You can pin a document in the list by clicking its pin to transform it into an active pin (
 ), and you can unpin a document by clicking its pin to transform it back to an inactive pin. When the displayed list of recent documents is full and you open additional documents, the last unpinned documents are removed from the list before any of the pinned documents are removed.
You may want to empty the list of recent documents so that documents which have been moved or no longer exist will not be shown, or you may want to change the number of recent documents shown. The procedures for performing these tasks in Word 2010 and Word 2007 are different.
-
In Word 2010, click the File tab, click Options, click Advanced, scroll down to the Display section, set the number in the Show this number of Recent Documents list to 0 to empty the list and disable the feature or to the maximum number of documents that you want to appear in the list (any number from 1 to 50), and click OK. If you emptied the list completely and you want to start displaying a list of recent documents, go back and set the number to its previous value or to another number that you prefer.
To clear the unpinned recent files, click the File tab, click Recent, right-click any item in the list of recent documents, click Clear Unpinned Items, and click Yes.
For the Microsoft help topic about managing the list of recent documents in Word 2010, see Customize the List of Recently Used Files.
- In Word 2007, click the Microsoft Office Button, click Word Options, click Advanced, scroll down to the Display section, set the number in the Show this number of Recent Documents list to 0 to empty the list or to the maximum number of documents that you want to appear in the list, and click OK. If you emptied the list completely and you want to start displaying a list of recent documents, go back and set the number to its previous value or to another number that you prefer.
It may be useful to know that the list of recent documents stored by Word holds up to the maximum number of items that can be displayed. This means that if you set a smaller number of recent documents to be shown and you increase the number of recent documents that will be shown, items from the stored list that had moved down and out of the range of the displayed items will be shown.
Opening Other Documents
The simplest way to open a document that is not included in the list of recent documents is to press Ctrl+O to open the Open dialog box, select the applicable file, and click OK. By default, the initial default document folder shown in the Open dialog box is the My Documents folder of the current user. You can change the initial default document folder.
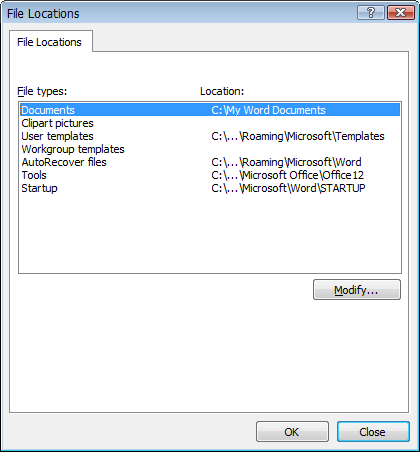
- In Word 2010, click the File tab, click Options, click Advanced, scroll down to the General section, click the File Locations button, select Documents, click Modify, select a new document folder, click OK, and then click OK to close the File Locations dialog box.
- In Word 2007, click the Microsoft Office Button, click Word Options, click Advanced, scroll down to the General section, click the File Locations button, select Documents, click Modify, select a new document folder, click OK, and then click OK to close the File Locations dialog box.
If you open a document from a folder other than the initial default document folder, the default folder for opening documents will be the last folder from which a document was opened until you open Word again.
Opening a Document Takes Time
When Word opens a document, it does not know how many pages are in it, so it displays 1 as the total number of pages in a header that contains the field for displaying the total number of pages. Word needs to lay out the document in memory and do some calculations before it knows how many pages are in the document. This may take some time, depending on the size of the document. You can see evidence of this activity on the status bar at the bottom of the screen in different forms, depending on your version of Word and the status bar options that you have selected. After this opening process is completed, anything you do that requires Word to refresh the screen, including typing a letter, will force Word to also update the total number of pages in the header.
Repairing Documents
Sometimes a document may fail to open properly. This may occur because the document became corrupted for various reasons. When this happens, repairing the document when you try to open it again may solve the problem. To repair a document, after you select the document in the Open dialog box, click the arrow on the Open button, and select Open and Repair at the end of the drop-down list.