Font Formatting
Sometimes users want to specify or change the appearance of a group of words or characters, or even of a single word or character, and they are not familiar enough with all of Word's font formatting options to know how to achieve the effect that they are seeking. Although most users are probably familiar with some different font families and sizes and with the italic and bold typefaces, many users do not know how to determine and apply the settings that are needed to add a colored background to their text or to type the name of the programming language C#, the formula for the area of a circle A = πr2, or the chemical formula for water H20.
The graphical user interface (GUI) provides ways to apply the various font formatting options (or character formatting options) to your text. Many of these options are displayed directly in the Font group on the Home tab of the Ribbon and on the contextual toolbar that appears when you right-click within text. Additional options are available in the Font dialog box, which you can open by clicking the Font dialog box launcher ( ) in the lower right-hand corner of the Font group on the Home tab.
You can also open the Font dialog box without reaching for your mouse by pressing Ctrl+D.
) in the lower right-hand corner of the Font group on the Home tab.
You can also open the Font dialog box without reaching for your mouse by pressing Ctrl+D.
The Font dialog box has two tabs.
- Font
- Character Spacing
The font formatting options that you can configure on the Font tab in the Font dialog box influence the appearance of the individual characters in your text.
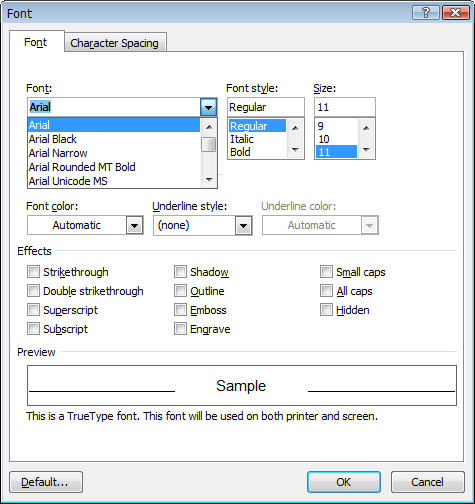
These font formatting options include the following.
- Font family (
 )
) - Font style (
 )
) - Font size (8 point, 10 point, 12 point, 16 point, 18 point)
- Font color (red, orange, green, blue, purple, brown)
- Underline style (
 )
) - Underline color (
 )
) - Strikethrough (
 )
) - Double strikethrough (
 )
) - Superscript (The mathematical expression x2 contains a superscripted 2.)
- Subscript (The chemical formula H20 contains a subscripted 2.)
- Shadow (
 )
) - Outline (
 )
) - Emboss (
 )
) - Engrave (
 )
) - Small caps (changes only lowercase letters) (
 )
) - All caps (
 )
) - Hidden
Additional font formatting options, which mainly influence spatial layout of the characters in your text, can be configured on the Character Spacing tab in the Font dialog box.
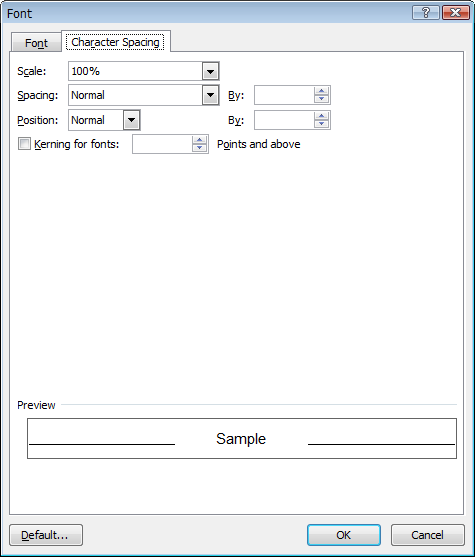
These formatting settings can be used to do the following.
- Change the width of characters relative to their height and thereby stretch or contract your text
- Increase the spacing between characters or decrease it so that characters can even overlap
- Change the position of your text and create raised characters
- Change the position of your text and create lowered characters
- Apply kerning
When you change font formatting options without selecting any text, the new settings will be applied to the text that you type after you make the changes. When you select text before changing the font formatting options, the new settings will be applied only to the selected text. For example, a simple way to apply specific font formatting to existing text is to select the text, press Ctrl+D to open the Font dialog box, select the font formatting options that you want to apply to the text, and click OK. If you know the keyboard shortcut or shortcuts (see the table below) for the font formatting that you want to apply, you can press the applicable key or keys to apply the settings to the text that you are about to type or to the text that you have selected.
If you want to change the font size note that the drop-down list of font sizes contains only whole numbers up to 72. However, you can add .5 to any font size, and you can type any font size up to 1638. Also, if you only want to change the font size you can press Ctrl+] to increase the font size by 1 point (pt) or Ctrl+[ to decrease the font size by 1 pt without opening any dialog box or clicking anything.
Almost Like Touch Typing
Users who copy text from printed or hand-written pages often quickly realize that their speed will be decreased by anything that causes them to move their eyes away from the text that they are transcribing. Touch typing, which was developed in the typewriter era, is based on the same idea. Ideally, touch typists do not look at the keyboard, and they move their hands away from the keyboard only when necessary, for example, to turn to the next page that they are copying. When we work in front of a computer, we often move our hands away from the keyboard to grab the mouse in order to do something that also requires us to move our eyes and focus on the options that we are choosing on the screen. The documented instructions for font formatting usually include a series of mouse-clicking tasks. However, you can use a different approach and work almost like a touch typist.
When you need to apply font formatting to text as you are typing, you can click the applicable controls or press Ctrl+D to open the Font dialog box, select the font formatting options that you want to apply to the text, click OK, and type the text that you want to have this formatting. Then you can open the Font dialog box again, clear the applicable font formatting options, click OK again, and continue typing. Alternatively, instead of opening the Font dialog box for a second time, you can press Ctrl+Space to cancel any font formatting that you configured and continue typing with the default font formatting. Note that if support for Chinese is enabled in Windows, you must use Ctrl+Shift+Z instead of Ctrl+Space.
If you want to work like a touch typist and you know the keyboard shortcut or shortcuts for the font formatting that you want to apply, you can press the applicable key or keys, type the text that you want to have this formatting, and press Ctrl+Space to return to the default font formatting. For example, as you are typing, when you come to a word or phrase that you want to have bold formatting, press Ctrl+B, type the word or phrase that you want to be in bold, press Ctrl+Space, and then continue typing with the default font formatting.
Now the great advantage of using the keyboard shortcuts for font formatting should become obvious. There is no need to move your hands away from the keyboard and reach for your mouse, and there is no need to move your eyes away from the source material that you are using to create your text in Word. If you need to apply the same font formatting repeatedly and you do not know the shortcut key for it, the advantage of using shortcut keys in this case is so great that it invariably pays to take the time to look up the shortcut key that you need and start using it.
The keyboard shortcuts, which are also called shortcut keys and shortcut key combinations, for font formatting are listed in the following table.
| Key | Action |
|---|---|
| Ctrl+Shift+A | Toggles changing the selected text to all capital letters. |
| Ctrl+B Ctrl+Shift+B | Toggles bold formatting. |
| Ctrl+Shift+C | Copies the formatting of the selected text. |
| Ctrl+D | Opens the Font dialog box with the focus at the Font combo box (see also Ctrl+Shift+F and Ctrl+Shift+P). |
| Ctrl+Shift+D | Toggles double underlining. |
| Ctrl+Shift+F | Opens the Font dialog box with the focus at the Font combo box. |
| Ctrl+Shift+H | Formats text as hidden. |
| Ctrl+I Ctrl+Shift+I |
Toggles italic formatting. |
| Ctrl+Shift+K | Toggles small caps. |
| Ctrl+Shift+P | Opens the Font dialog box with the focus at the font Size combo box. |
| Ctrl+Shift+Q | Applies the Symbol font. |
| Ctrl+Shift+S | Opens the Apply Styles task pane for applying, creating, or modifying styles and formatting (use Alt+Ctrl+Shift+S to modify a style without applying it to the selection). |
| Alt+Ctrl+Shift+S | Opens the Styles pane. |
| Ctrl+U Ctrl+Shift+U |
Toggles underlining. |
| Ctrl+Shift+V | Applies the formatting previously copied using Ctrl+Shift+C to the selected text. |
| Ctrl+Shift+W | Toggles underlining whole words. |
| Ctrl+Shift+Z | Resets the font formatting to the default font formatting of the applied style. If support for Chinese is not enabled in Windows, Ctrl+Space also does this. |
| Shift+F1 | Shows or hides the formatting properties in the task pane. |
| Shift+F3 | Changes the text to all capital letters, to all small letters, or to a capital letter at the beginning of every word. |
| F4 | Redoes the last action performed. |
| Ctrl+Space | Resets the font formatting to the default font formatting of the applied style (same as Ctrl+Shift+Z). If support for Chinese is enabled in Windows, Ctrl+Space switches the character input mode. |
| Ctrl+= | Toggles subscript formatting. |
| Ctrl++ | Toggles superscript formatting. |
| Ctrl+[ | Decreases the font size by 1 pt. |
| Ctrl+Shift+> | Increases the font size by 1 pt up to 12 pt or by 2 pt above 12 pt. |
| Ctrl+] | Increases the font size by 1 pt. |
| Ctrl+Shift+< | Decreases the font size by 1 pts at 12 pt or less, of by 2 pt above 12 pt. |
| Ctrl+[ | Decreases the font size by 1 pt. |
Using Find and Replace to Format
When you need to format a certain word or phrase everywhere where it already appears in a document, you can use Word's Find and Replace feature to apply the required formatting. For example, the following steps describe how to apply bold formatting to a word or phrase throughout a document.
To apply bold formatting to a word or phrase
- Press Ctrl+H to open the Find and Replace dialog box.
- In the Find what box, type the word or phrase that you want to format.
- In the Replace with box, type ^&.
- Click More, click Format, and then click Font.
- In the dialog box that opens, in the Font Style drop-down list, select Bold, and click OK Notice that a description of the formatting that you configured appears below the Replace with box.
Alternatively, instead of this step and the preceding step, you can press Ctrl+B in the Replace with box.
- Click Replace All, or click Find Next and then click Replace, where applicable.
- Before you perform your next find and replace task, with your cursor in the Replace with box, click More if necessary, click No Formatting to clear the formatting that you configured, and then click Less.
Adding a Colored Background and Borders
Although the background color and borders for text are not configured in the Font dialog box, they are included here together with the font formatting settings because the borders and background colors (shading) are included in the settings defined in a character style, because the default background color and borders are restored along with the other font formatting settings by pressing Ctrl+Space, and because users often modify the font color when they add a colored background. In addition, a description of borders and shading in the context of font formatting will hopefully help to dispel the misconception that borders and shading can only be configured in a table or for whole paragraphs.
To add a colored background and borders
- If you want to add a colored background and/or borders to a portion of the text within a paragraph or to multiple paragraphs, select the applicable text or paragraphs. If you want to add a colored background and/or borders to a single paragraph, place your cursor within the applicable paragraph.
- On the Home tab of the Ribbon, in the Paragraph group, click the Shading button (
 ) to add the current default background color. If you want to select a background color other than the current default color, click the small arrow on the Shading button, and then select one of the colors displayed or define your own custom color.
 - If you want to add a border around your colored background, click the Borders button (
 ) to add the current default borders (the original default or the last border style that you selected). If you want to select a border style that differs from the current default border style, click the small arrow on the Borders button, and select one of the border styles displayed or click Borders and Shading to define your own custom borders.
 - If you want to change the font color, in the Font group, click the Text Color button to apply the text color currently displayed on it. If you want to apply a text color other than the color currently displayed, click the small arrow on the Text Color button, and then select one of the colors displayed or define your own custom color.
If you choose a background color and a text color that contrast with one another, your text will be more clearly visible.
Overline
Although Word offers a wide variety of types of underlining, there is no font formatting option for creating a line over a character or over a word or phrase. There are, however, ways to add an overbar or macron above a single character and to create an overline over a word or phrase. For more information, see Creating Overbars and Banner Text/Applications with the EQ Field. Note that the overbars created by the techniques described on those web pages cannot be removed by resetting the font formatting to the default settings, for example, by pressing Ctrl+Space.
Dropped Initial Capital Letter
Word provides a simple way to create a large dropped initial capital letter similar to the letter at the beginning of this paragraph, but it is not one of the font formatting options. Dropped initial capital letters can be created in the following manner.
Place your cursor anywhere in the paragraph in which you want to create it. On the Insert tab of the Ribbon, in the Text group, click Drop Down, and then in the list that appears, click Dropped or In margin. If you want to modify the other options, instead of clicking Dropped or In margin, click Drop Down Options, and then in the dialog box that opens, select Dropped or In margin, modify the other settings as desired, and click OK.