Mysterious Behavior
Reports from users about mysterious phenomena that unexpectedly occur in their Word documents continue to appear in user forums. Even if logical explanations could be found for these strange phenomena, there would still remain the fact that these phenomena waste the time of users who need to recover from an often horrifying experience and the loss of confidence in Word that such experiences instill. Such users often need to spend time restoring their documents to a useable form that is free of these phenomena. The long list of strange phenomena includes the unexpected and undesirable appearance of the following.
- Numbers that suddenly appear as a user is typing ordinary text
- Mysterious L-shaped symbols in the corners of every page of a document
- Strange symbols between words and at the end of lines
- Lines of various shape and thickness that stretch across your pages
- Content from an old document in a new document
- An infinitesimally small top margin
- Problems that you didn't have yesterday
- Paragraphs and sometimes pages of random or Latin text
Investigators seeking the truth have found explanations for some of these mysterious phenomena. This page describes some of the explanations that they discovered. By understanding these explanations, you can prevent many of these strange phenomena from occurring in your documents.
Numbers That Appear for No Apparent Reason
One of the most interesting reports of this phenomenon was provided by a concerned boyfriend, who reported to a user forum that random numbers were repeatedly appearing in an important document that his girlfriend was typing for one of her college courses. One theory that might explain this phenomenon is based on the fact that pressing Alt+X transforms the character right before the cursor into its Unicode value. Try it. Press Alt+X after any letter, number, punctuation mark, or space, and that character will be replaced by a four-digit hexadecimal number (a number that may include the letters A, B, C, D, E, and F). Pressing Alt+X again removes the number and restores the original character. But who presses Alt+X while typing an important paper?
Now look at your keyboard and notice that the Alt key is just below the X key. Thus, ordinary people who are typing a word containing the letter x may unintentionally hit the Alt key along with the X key, especially when they are under the pressures of typing a long important paper, and generate what appear to be random numbers.
Another side lesson that you can learn from this is that if you know the four-digit hexadecimal Unicode value of a character, you can insert that character by typing its four-digit code and pressing Alt+X. However, learning such codes to insert characters is probably not a good use of your time. It is much easier to create an AutoText entry (or Quick Part) for such characters. That way, you only need to remember and type an abbreviated name of the character and press F3.
Mysterious L-Shaped Lines in Every Corner
Users who have Chinese, Japanese, or Korean available in their list of languages often report the appearance of four L-shaped lines (one in each corner) on every page when they open a document. Some users have described them as brackets displayed to the left and right of all headers and footers. Microsoft acknowledges that these lines can appear and provides complete instructions for preventing them from appearing in the Knowledge Base article Margin marks or crop marks appear on each corner of the page when you open a document in Word. The only mystery here is why this occurs only when certain languages are available.
Strange Symbols between Words and at the End of Lines
Users who did not do anything to show the non-printing characters that indicate spaces between words, the end of paragraphs, the end of table cells and rows, and more are often surprised and troubled when these symbols suddenly appear for no apparent reason. For users who are not familiar with these non-printing characters, this can be another one of Word's panic-invoking situations.
These symbols can appear unexpectedly if you accidentally hit Ctrl+Shift+8, which toggles the appearance of these symbols. This could happen when you mean to press Shift+8 to type an asterisk (*). To make these symbols vanish, just press Ctrl+Shift+8 again.
Lines of Various Shape and Thickness That Stretch Across Your Pages
By default, Word automatically creates six different types of border lines that stretch across the page when you type a hyphen (-), the underscore character (_), an equal sign (=), a tilde (~), the pound sign (#), or an asterisk (*) three or more times at the beginning of a new line with nothing before, between, or after these characters and then press Enter. The lines created by these characters have the following forms, which are shown in the order that the characters were cited.
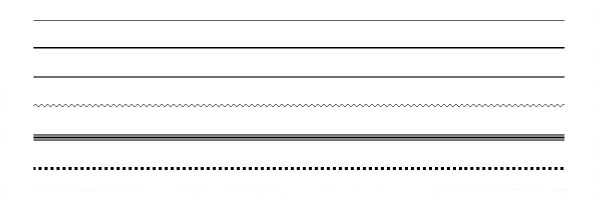
If the lines that you see on your pages look like any of these lines, they were probably created by typing one of the six characters three or more times and then pressing Enter. If you want to type one of these characters three or more times without creating a line, simply type a space or some other text after them before you press Enter. If you forget to insert a space or other text and a line appears, you can remove it immediately by pressing Alt+Backspace or Ctrl+Z, that is, either of the keyboard shortcuts that undo the previous action.
These lines are created as the lower border of the previous paragraph. You can take advantage of this fact to remove such a line when undoing the previous action can no longer remove it. In this case place your cursor immediately above it, that is, within the previous paragraph and press Ctrl+Q. Pressing this key resets the formatting of the paragraph to the default formatting, which generally specifies no borders.
You can disable the automatic generation of these lines by performing the following steps. In Word 2010, on the File tab, click Options, click Proofing, click Autocorrect Options, and then on the AutoFormat As You Type tab clear the Border Lines check box. After you disable this feature, you can enable it again by selecting the Border Lines check box.
To disable this feature in Word 2007, click the Microsoft Office Button, click Word Options, click Proofing, click Autocorrect Options, and then on the AutoFormat As You Type tab clear the Border Lines check box. After you disable this feature, you can enable it again by selecting the Border Lines check box.
This phenomenon has also been described in There is a line in my document that I can't delete because I can't select it. How did it get there, and what can I do about it? by Suzanne S. Barnhill and Dave Rado.
Content from an Old Document in a New Document
There is a relatively simple explanation for this phenomenon. Every Word document is associated with a template. The Normal template (Normal.dotm) is the default template, but you can create new documents with any template that is available in your system. If you create a new document with a template that contains text or other content, the text or other content in the template will appear in the new document.
Users can mistakenly open a template instead of creating a new document based on it. They can then proceed to use the template as if it were a document, add content to it, and save the changes to it. When they subsequently create a new document based on that template, the old content appears in the new document.
This phenomenon and ways to remove old content from the Normal template are described in detail in Why is my “Blank Document” not blank? by Suzanne S. Barnhill.
An Infinitesimally Small Top Margin
When users open a document in Print Layout view, they sometimes find that the top margin seems to have disappeared. After they check their margin settings and print the document, they conclude that the top margin is correctly configured in the document file, but Word is not displaying it for some reason. They soon discover that Word is cutting off both the top margin and bottom margins of all the documents that they open in Print Layout view, and they hopelessly resign themselves to having to live with this strange phenomenon. Their documents look like the document in the following figure.
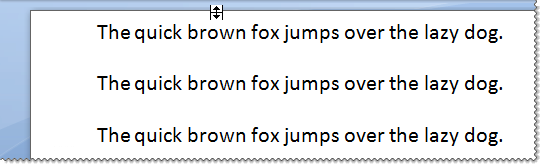
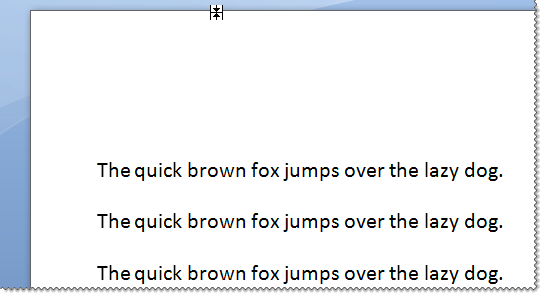
As in the case of many other mysterious phenomena in Word, the disappearance of the top and bottom margins is caused by a feature that users accidentally activate without knowing that it exists and thus have no idea of how to turn it off. When you place your mouse pointer near the upper edge of the page in Print Layout view, your mouse pointer takes on one of the forms with two small arrows shown above the word “brown” in the two figures in this section. Double-clicking the mouse when the mouse pointer takes on one of these forms hides or shows the white space between pages, that is, the top and bottom margins.
As users move their mouse to click options in the user interface, they may inadvertently double-click the mouse just when it is located near the upper edge of a page in Print Layout view.
When this white space is hidden, the top and bottom margins vanish. Positioning the mouse pointer again near the upper edge of the page and double-clicking the mouse shows the white space between pages and restores the top and bottom margins. The top margin is then displayed as in the following figure.
This phenomenon has been documented by Microsoft for Word 2007 with another method for restoring the top and bottom margins in My Top Margin is Missing.
Problems That Seem to Appear Overnight
Sometimes everything in Word is working fine one day, and a serious problem is observed on the next day when, for example, Word is started or an attempt is made to open a document, save a document, close a document, or close Word. It may also become impossible to select, cut, and paste parts of a document, and the mouse may stop working. Such problems may occur if Word 2007 is running when a Vista computer is restarted to complete the installation of an automatic update for Word 2007. In this case the problems are caused by corruption of the Word Data registry subkey, and they can easily be fixed by going to the Microsoft Knowledge Base article How do I fix the problem that I experience after I install an automatic update for Word 2007 on a Windows Vista-based computer? and clicking the FixIt button.
Similar problems may also be observed in other versions of Word and on other versions of the Windows operating system. In these cases they may also be caused by corruption of the Word Data registry subkey or by corruption of the Word Options registry subkey and can be fixed by deleting the applicable subkey. After either of these registry subkeys is deleted, Word will rebuild it with the default settings when Word is started again. In some cases, the problems are caused by corruption of the default template (Normal.dotm). In these cases the problems can be fixed by renaming the default template file and letting Word create a new default template based on the default settings. For instructions about how to delete the Word Data and Options registry subkeys, how to rename the default template file, and how to perform additional troubleshooting steps, see the Microsoft Knowledge Base article How to Troubleshoot Problems That Occur When You Start or Use Word.
These problems may also be caused by a poorly designed add-in. If you have installed any add-ins, you can easily find out if an add-in is causing your problem by starting Word in Safe mode. To do this, hold down the Ctrl key when you launch Word, and then click Yes to confirm that you do want to start Word in Safe mode. If your problem does not occur in Safe mode, your problem is almost certainly caused by an add-in or code in the default template or another template in your Startup folder. For instructions about to how to determine which add-in is causing the problem, see the Microsoft Knowledge Base article How to Troubleshoot Problems That Occur When You Start or Use Word.
There have been reports that these problems may be caused by certain printer drivers. You can easily determine whether your printer driver is responsible by changing the default printer. There are also other possible causes of problems that occur when Word is started. For more troubleshooting information, see Solving Crashing Problems by Graham Mayor.
Paragraphs or Pages of Random or Latin Text
Word provides a feature for generating random text. Such random texts can be useful, for example, for trying out various formatting options when you design a document and want to see how it works. To use this feature, at the beginning of a line, type the command =RAND(m,n), where m is a placeholder for the number of paragraphs that will be generated and n is a placeholder for the number of sentences that will be included in each paragraph, and then press Enter. For example, typing =RAND(5,7) at the beginning of a line and then pressing Enter will insert five paragraphs with seven sentences. The variant =LOREM(m,n) works similarly, but inserts Latin text instead.
This can be a useful feature to users who know about it. If you type these expressions (for example, under the advice or instructions of a prankster) and do not know about this feature, you may sit staring at your computer screen for a long time wondering where the strange text came from.