Bookmarks: The Basics
A bookmark specifies the location of a point or of a block of text or other content within a document. You can use a bookmark to move to its location by entering or selecting its name on the Go To tab of the Find and Replace dialog box or in the Bookmark dialog box and then clicking Go To, or by activating a link to the bookmark. A link to a bookmark can be a hyperlink or a cross-reference that is configured to act as a hyperlink. The text displayed in a cross-reference to a bookmark, for example, the number of the page where the bookmark is located, can be updated to display the correct page number after the page number changes because you added text or other content to your document or removed something from it.
You can also use a bookmark that encloses text to repeat the enclosed text at other locations in your document by inserting cross-references in those locations. When you use a bookmark in this way, you can create and revise the text in one place and have Word update it in all the other locations. For more information about this and other techniques that you can use to repeat text in a document, including some insight into why different techniques may be preferable in different scenarios, see Repeating Data by Greg Maxey.
In addition, you can use cross-references to bookmarks to obtain the results of calculations based on the text enclosed by the bookmarks. For example, you can mention the prices of several products in your document, bookmark them, and then display the sum of the bookmarked prices using a formula field without calculating the sum yourself.
This page describes how to perform the basic tasks related to bookmarks. For the Microsoft help topics that describe how to perform some of these tasks, see Add Bookmarks in a Document, Delete a Bookmark, and Create a Hyperlink. The tasks described on this page include the following.
- Adding or Deleting a Bookmark
- Linking to a Bookmark
- Changing the Text Associated with a Bookmark
- Using Bookmark Brackets
Adding or Deleting a Bookmark
Before you create a new bookmark, you should decide where it will be located and whether it will specify a point in your document or will enclose a block of text or other content. You should also prepare a name for it. Bookmark names can contain letters, digits, and the underscore character (_), but they must begin with a letter and cannot contain a space. Then follow the steps in the procedure for adding a bookmark in your version of Word.
To add a bookmark
- Move your cursor to the point that you want the bookmark to specify, or select the block of text or other content that you want the bookmark to enclose.
- On the Insert tab of the Ribbon, in the Links group, click Bookmark to open the Bookmark dialog box.

Alternatively, press Ctrl+Shift+F5 to open the Bookmark dialog box.
- Under Bookmark name, type a name, or select a name of an existing bookmark that you want to replace.
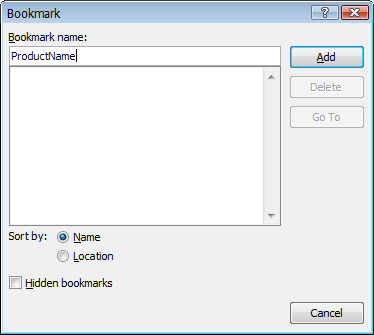
- Click Add.
To delete a bookmark, in the Bookmark dialog box, select the bookmark that you want to delete and click Delete.
You cannot directly rename a bookmark. Instead, ascertain the location of the bookmark that you want to rename and whether it specifies a point in the document or encloses some text or other content. Then delete the existing bookmark and create a new bookmark at the same location with the new name.
In addition to bookmarks that are inserted according to the methods just described, you can also create a bookmark that can be used just like a bookmark that encloses text, but the bookmarked text is not displayed at the location of the bookmark. Such a bookmark is created by inserting a SET field in a document or an ASK field in a template. For further details regarding such invisible bookmarks, see Adding a Bookmark in a SET Field.
Linking to a Bookmark
Word provides two ways to create a link to a location in a document: hyperlinks and cross-references that are configured as hyperlinks. In both cases, the destination must be bookmarked. The possible bookmarked destinations include the following:
- A point or a block of text or other content that is specified by a user-created bookmark
- A paragraph that is formatted with one of the built-in heading styles in the series from Heading 1 through Heading 9, for which Word automatically creates a bookmark
- An automatically numbered item, including footnotes, endnotes, figure captions, table captions, and items that have a user-defined caption label, for which Word also automatically creates a bookmark
The bookmarks that are created automatically by Word are hidden. Their names, which begin with an underscore character (_) and include a long number, can be observed when the Hidden bookmarks check box in the Bookmark dialog box is selected. They can be used as user-created bookmarks. However, when you want to create a link to a numbered item that has a hidden bookmark, it is generally more convenient to choose the item based on its number or the text in it rather than to directly use its hidden bookmark.
Note that ordinary hyperlinks can be created only for user-created bookmarks and paragraphs formatted with a built-in heading style.
To create a hyperlink to a bookmark or heading
- Select the text that you want to be displayed in the hyperlink.
- Open the Insert Hyperlink dialog box.
- Press Ctrl+K.
- On the Insert tab of the Ribbon, in the Links group, click Hyperlink.
- In the Insert Hyperlink dialog box, under Link to, select Place in This Document.
- Click the name of the bookmark or the heading that you want to be the destination of the hyperlink.
- If you want to specify a personalized screen tip, click ScreenTip, and type the text that will appear when the mouse hovers over the hyperlink. If you do not specify a screen tip, Word will display the default screen tip for the applicable type of destination.
- Click OK.
To do this, do either of the following:

Cross-references that are configured as hyperlinks offer several advantages over ordinary hyperlinks, including the following.
- The text displayed in a cross-reference is automatically generated by Word according to the option that you select and can be updated after the referenced item is modified.
- Cross-references can be configured as hyperlinks to automatically numbered items, such as footnotes, endnotes, figure captions, table captions, and items that have a user-defined caption label.
To create a cross-reference configured as a hyperlink to a bookmark
- Move the cursor to the place where you want to link to be created.
- Open the Cross-reference dialog box.
- In the Cross-reference dialog box, under Reference type, select Bookmark as the type of item that the link will target.
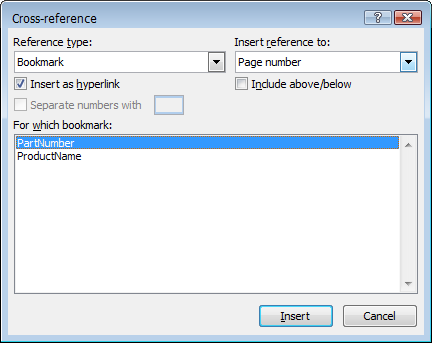
- Under Insert reference to, select the type of text that will be displayed in the link.
- Select the Insert as hyperlink check box if it is cleared.
- Under For which bookmark, select the bookmark that will be the destination of the link.
- Click Insert, and then click Close.
- If you want your link to have the same underlining and color as a hyperlink, select the displayed text, press Ctrl+U to add underlining, and then press Ctrl+D. In the Font dialog box, click the Font color combo box, click the appropriate color (or create a custom color), and click OK.
To do this, on the Insert tab of the Ribbon, in the Links group, click Cross-reference.
Note. Do not attempt to make a cross-reference configured as a hyperlink look like a hyperlink by applying the Hyperlink style to it.
To update a single cross-reference (REF, PAGEREF, or NOTEREF field), click it and press F9. To update all of the fields in the body of your document, press Ctrl+A to select the entire document, and then press F9. To update all the fields in your headers and footers, press Ctrl+F2 to switch to print preview, and then press Ctrl+F2 again to return to the body of your document.
Changing the Text Associated with a Bookmark
When you need to modify the text or other content that is enclosed by a bookmark or is located next to a bookmark for a point in your document, you must be careful not to delete the bookmark itself. For example, if you would select all of the text enclosed by a bookmark and overwrite or delete it, the bookmark would be deleted along with the selected text. In order not to delete a bookmark that encloses text, always leave at least one character of text within the bookmark. For example, you can add the new text and then delete the old text, or you can overwrite nearly all of the old text and then delete the small remaining piece.
Similarly, if you have a bookmark that specifies the point at the beginning of a paragraph and you select text before the bookmark, extend the selection to include text in the paragraph marked by the bookmark, and then overwrite or delete the selection, the bookmark will be deleted. Nevertheless, you can safely delete or overwrite text or other content that is located before or after a bookmark of this type as long as you do not select text or other content on both sides of the bookmark.
To help you avoid deleting bookmarks when you edit your document, Word provides bookmark brackets. Bookmark brackets show you exactly where your bookmarks are located and what they enclose. With bookmark brackets, you can select part of the text, overwrite it or delete it, and then delete the remaining unwanted text. The procedures for displaying bookmark brackets are described in the next section.
Even macros that change text enclosed by a bookmark must address this issue. For more information about writing a macro that changes text enclosed by a bookmark, see Inserting Text at a Bookmark without Deleting the Bookmark by Dave Rado.
Using Bookmark Brackets
Bookmark brackets indicate the location of all user-created bookmarks and show what they enclose. When bookmark brackets are displayed, a bookmark that encloses text or other content in a document appears within gray brackets ( ) on your screen. A bookmark to a point location appears as an I beam (
 ). These symbols will not appear in the printed document. Bookmark brackets are especially useful when you want to modify the text or other content that is enclosed by a bookmark that you or another user created without deleting the bookmark itself.
Note. Bookmark brackets are not displayed for the hidden bookmarks that Word creates automatically for the built-in heading styles and other automatically numbered items, such as footnotes, endnotes, figure captions, table captions, and items that have a user-defined caption label.
To display bookmark brackets
- Click the File tab (Word 2010 and newer versions of Word) or the Microsoft Office Button (Word 2007), and then click Options (Word 2010) or Word Options (Word 2007).
- Click Advanced, and then under Show document content select the Show bookmarks check box.
- Click OK.
When you want to stop displaying bookmark brackets, follow the steps to display bookmark brackets for your version of Word, but clear the Bookmarks check box instead of selecting it.
Regardless of whether bookmark brackets are displayed or not, you can find out the name of the bookmark at any location by moving your cursor to it and opening the Bookmark dialog box. If your cursor is located at or within a bookmark when you open the Bookmark dialog box, the name of the applicable bookmark will be selected. If the bookmark encloses text or other content, you can select all of the text or other content by pressing Enter or clicking Go To.